It takes two Raspberries to run a clock
Despite lousy title, I will tell my success story how to add visual output to well known IoT tool called Node-RED. One Raspberry Pi, let’s call it RPI-RED, will be running Node-RED another one RPI-LED will be dedicated to server LED panel.
First you should should install Node-RED to RPI-RED. Installation is well described in previous post.
Also diagram below illustrates all necessary parts for system to be running. This topology can be scaled up by adding more LED panels and used for example to manage queues, display traffic signs, show discounts in larger shopping center, etc.
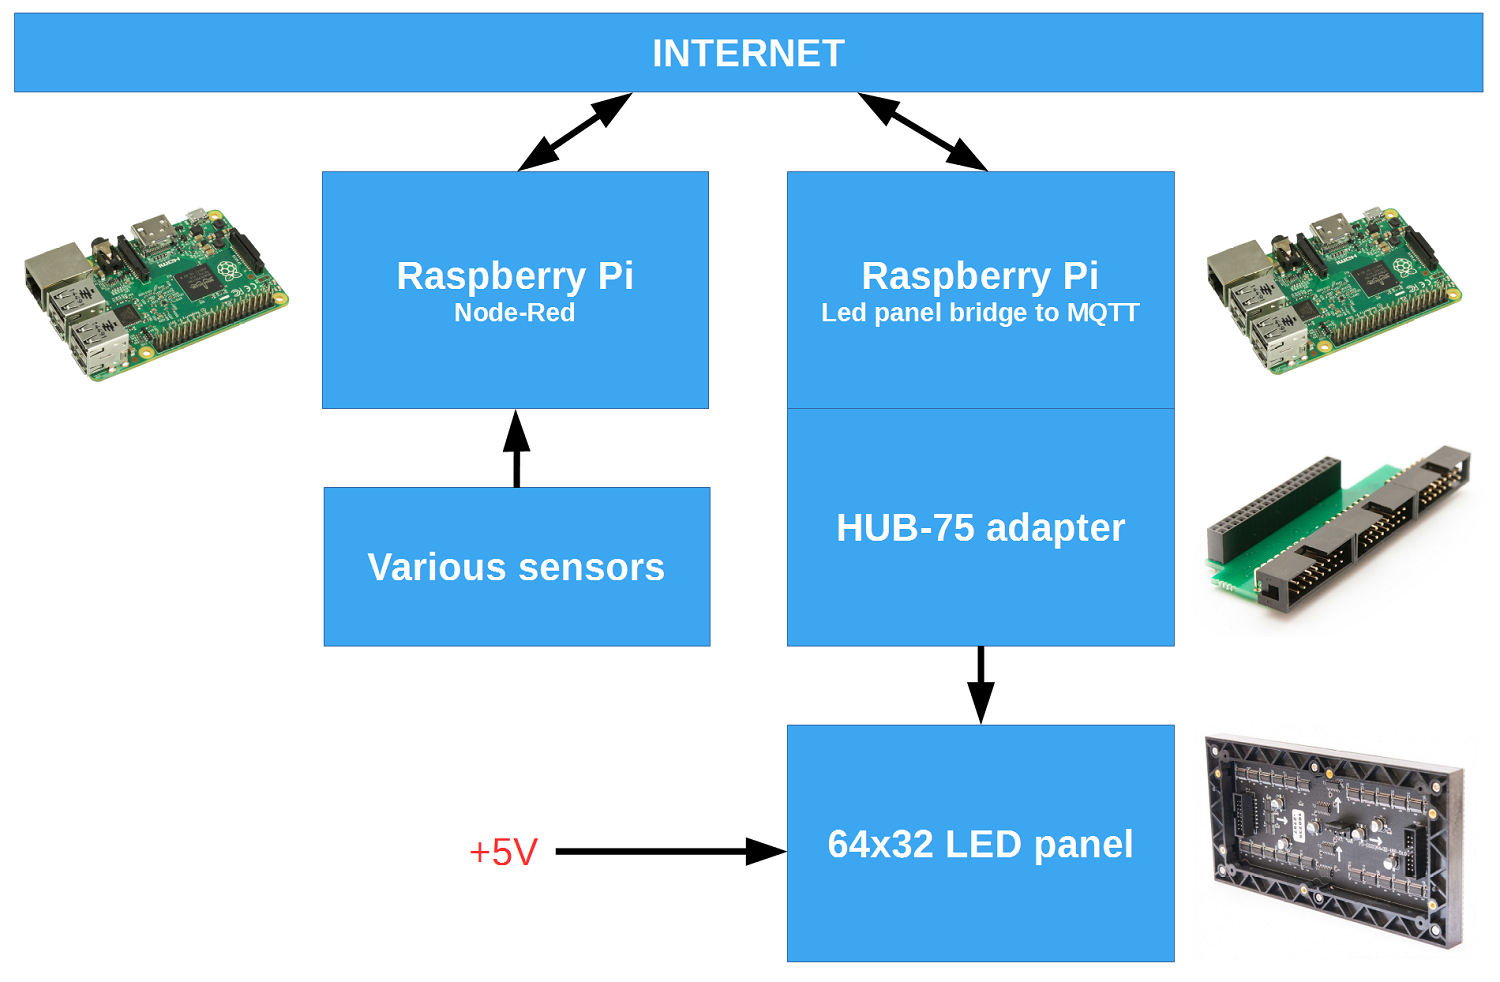
Component list:
- Raspberry Pi x2
- LED panel
- HUB-75 adapter
- 5V power supply for LED panel not less than 18W
- 5V supply for Raspberry Pi x2
Install LED control software to RPI-LED
As usual, install jessie lite, setup headless mode by enabling ssh server and install rpi-rgb-led-matrix from hzeller github repository. His repository is primary information source how to work with these panels, and if you fall into any issues, please read it first as I will be covering it very briefly. More panels can be connected to single Raspberry remember 9*9 arrangement playing video?
sudo apt-get install -y git
cd ~
git clone https://github.com/hzeller/rpi-rgb-led-matrix.git
cd rpi-rgb-led-matrix
make -C examples-api-use
That’s it. Now let’s test if we have working hardware.
Test if LED panel works
- Unplug USB power from RPI-LED
- Connect HUB-75 adapter
- Connect LED panel
- Connect 5V power to panel
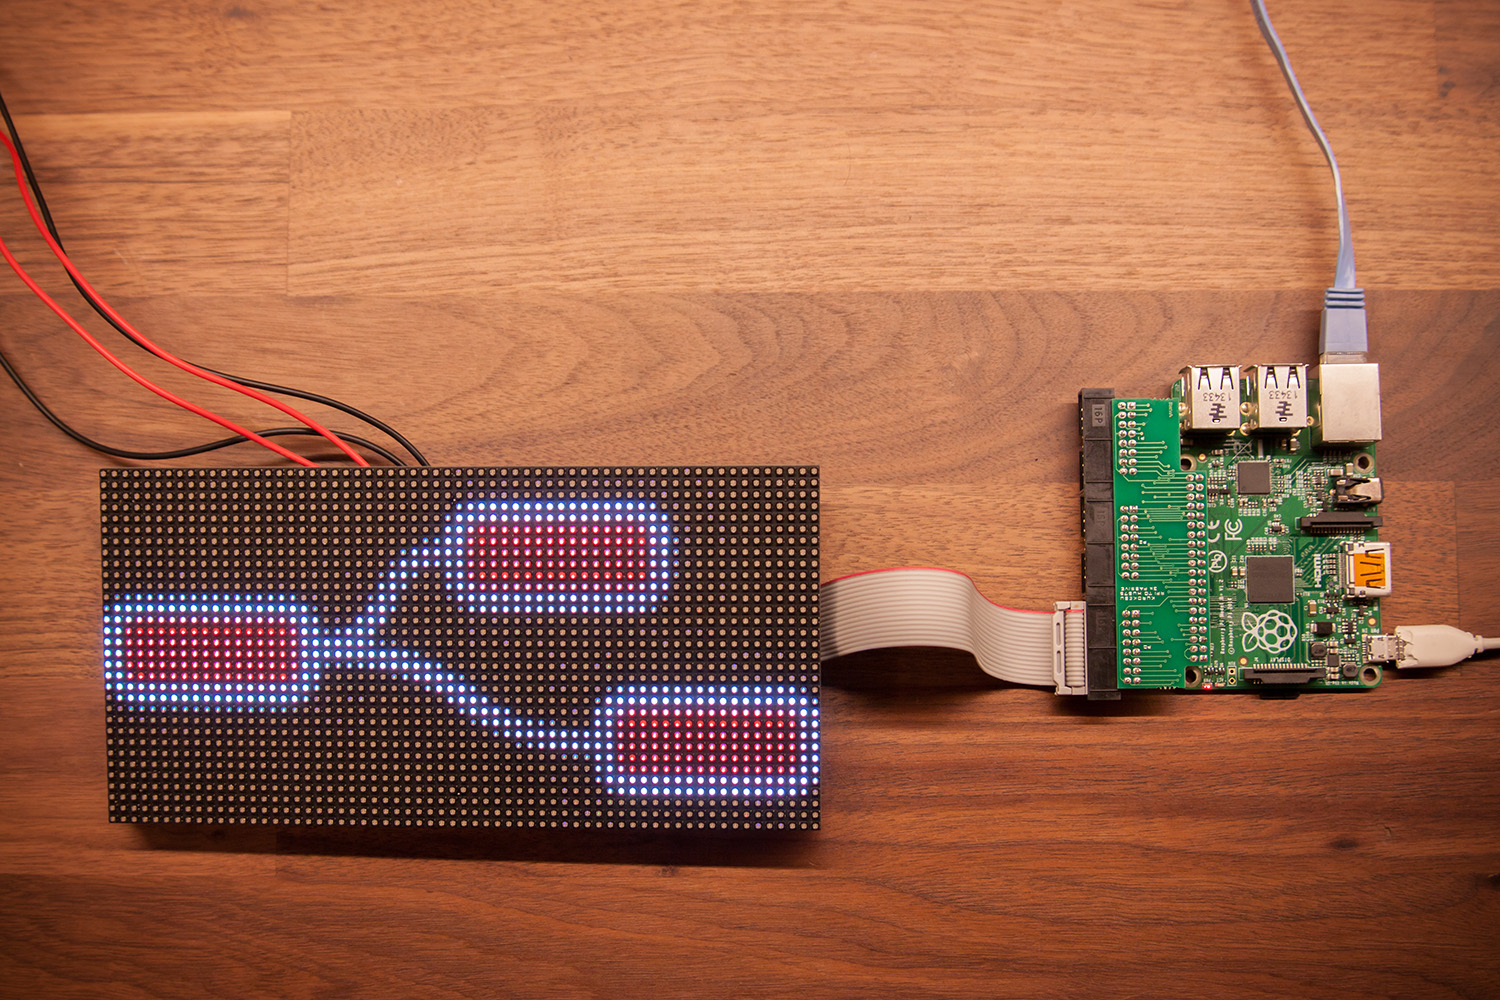
It should look like this
Run included demo:
cd ~/rpi-rgb-led-matrix
sudo examples-api-use/demo -c2 -D0
You should see nice demo, which will indicate you done well and all major parts are working.
Run Python sample project
It is time to step one more level up – control LED panel from Python script. Install Python and some libraries.
cd ~/rpi-rgb-led-matrix/python
sudo apt-get install -y python
sudo apt-get install -y python-imaging
sudo python setup.py install
Now check if python samples work:
cd ~/rpi-rgb-led-matrix/python/samples
sudo python image-scroller.py
You should see LED panel working again. Good, we are close to our goal.
Interface to Node-RED over MQTT
MQTT is de-facto standard for many Internet connected devices and is basically used for packet communication in a publish/subscription manner. There are tons of information about it, and if necessary feel free to start from mqtt.org. Install python bindings for MQTT called paho.
sudo pip install paho-mqtt
That’s it. Now when we have ability to speak to Node-RED, let’s connect all parts together.
Connect all strings together
If you completed all steps correctly, this setup will allow you to:
- Insert visual blocks into Node-RED editor
- Assign various tasks and functions
- Communicate with world using various protocols like TCP, UDP, WebSockets, MQTT and some more protocols
- Control GPIO pins
- Create simple User Interface directly from Nore-RED
- Receive and aggregate sensor data
- Insert data into database and run queries
- And much more
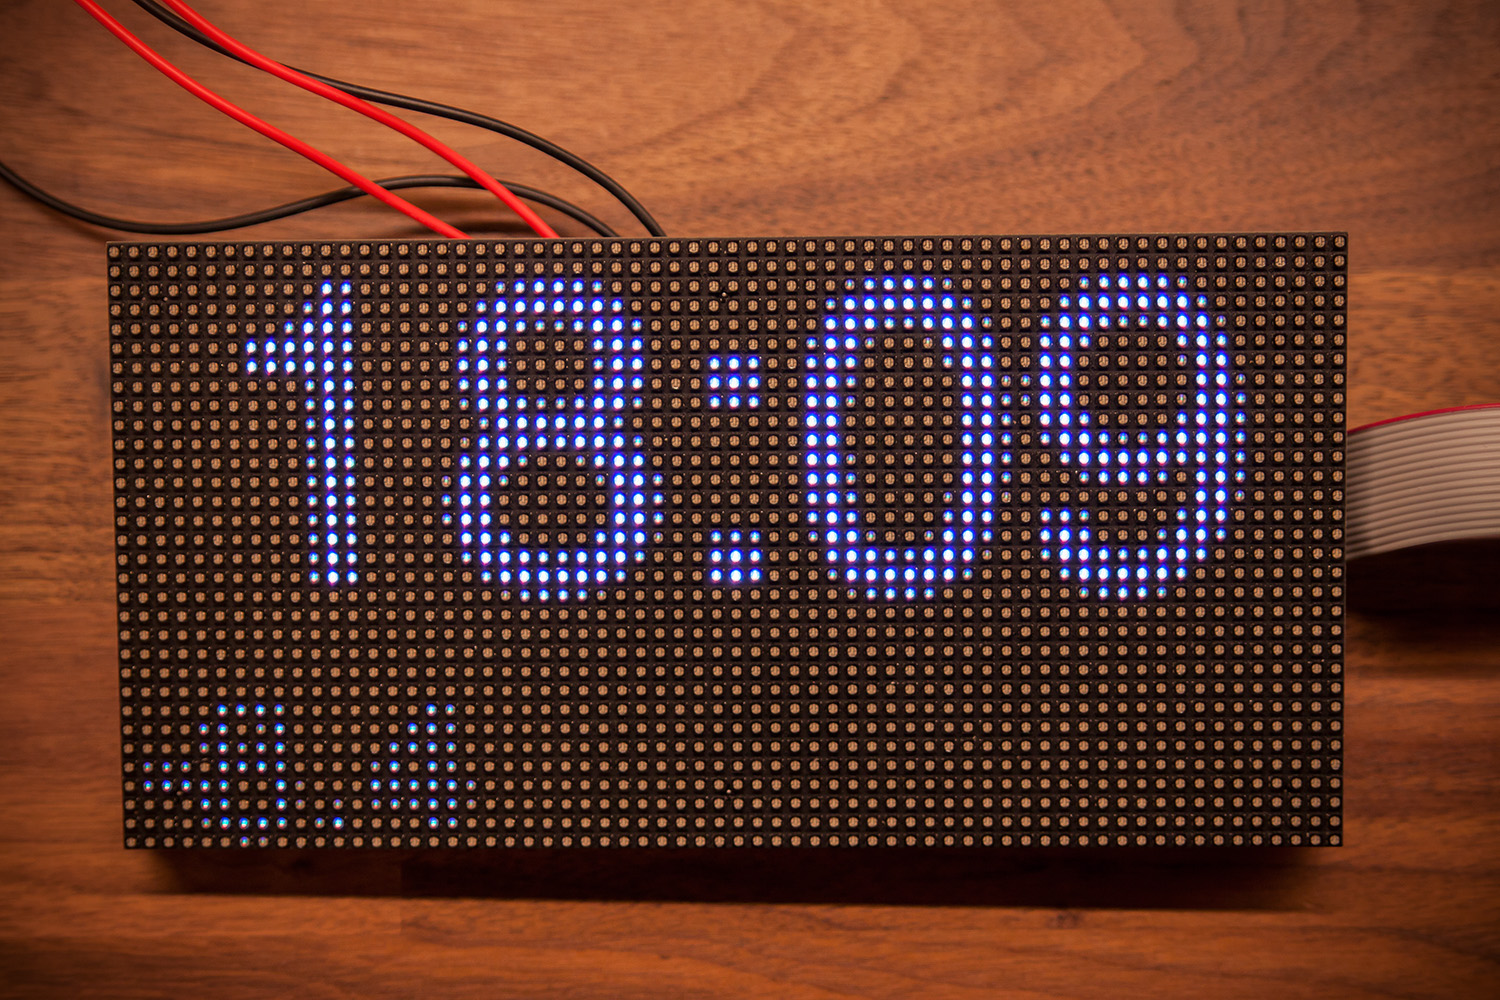
After completing my tutorial you should see result like in picture below. I tried to keep demonstration as simple as possible. Ideas for future can cover graphing historical temperature data, adding weather forecasts with icons, displaying notifications from google calendar, adjusting brightness according to date time or actual sensor data… I could go on for a long time naming possible usage scenarios.
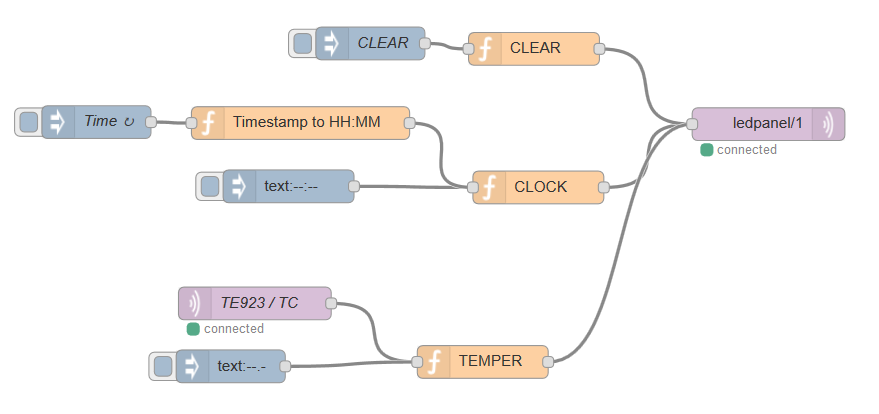
Node-RED flow
This flow aggregates timestamp and temperature sensor from MQTT. Adds text parameters like position, color, font to message and emits it to MQTT server at topic /ledpanel/1.
Below is a json line to import directly into Node-RED. Adjust MQTT credentials as needed.
[{"id":"1fa87483.b31adb","type":"mqtt out","z":"48807c1d.6db04c","name":"","topic":"ledpanel/1","qos":"","retain":"","broker":"5252913.f77dff","x":1004.88330078125,"y":180.88333129882812,"wires":[]},{"id":"6cbafc93.dc906c","type":"inject","z":"48807c1d.6db04c","name":"","topic":"text","payload":"--:--","payloadType":"str","repeat":"","crontab":"","once":false,"x":564.88330078125,"y":237.88333129882812,"wires":[["b5190bb3.c7181"]]},{"id":"b5190bb3.c7181","type":"function","z":"48807c1d.6db04c","name":"CLOCK","func":"var ret = {};\n\nret[\"text\"] = msg.payload;\n\nret[\"x\"] = 5;\nret[\"y\"] = 1;\n\nret[\"red\"] = 100;\nret[\"green\"] = 100;\nret[\"blue\"] = 100;\n\nret[\"font\"] = 19;\n\nret[\"function\"] = \"set_text\";\n\nmsg.payload = ret;\n//msg.topic = \"set_text\";\n\n\nreturn msg;\n","outputs":1,"noerr":0,"x":793.88330078125,"y":238.88333129882812,"wires":[["1fa87483.b31adb"]]},{"id":"33e7699a.52912e","type":"inject","z":"48807c1d.6db04c","name":"CLEAR","topic":"","payload":"TEST123 ","payloadType":"str","repeat":"","crontab":"","once":false,"x":639.88330078125,"y":106.88333129882812,"wires":[["abd7dc51.9b6068"]]},{"id":"abd7dc51.9b6068","type":"function","z":"48807c1d.6db04c","name":"CLEAR","func":"var ret = {};\n\nret[\"red\"] = 0;\nret[\"green\"] = 0;\nret[\"blue\"] = 0;\n\nret[\"function\"] = \"clear\";\n\nmsg.payload = ret;\n\nreturn msg;\n","outputs":1,"noerr":0,"x":789.88330078125,"y":111.88333129882812,"wires":[["1fa87483.b31adb"]]},{"id":"de7eba35.0d97c","type":"function","z":"48807c1d.6db04c","name":"TEMPER","func":"var ret = {};\n\nret[\"text\"] = msg.payload+\" \";\n\nret[\"x\"] = 1;\nret[\"y\"] = 24;\n\nret[\"red\"] = 30;\nret[\"green\"] = 30;\nret[\"blue\"] = 30;\n\nret[\"font\"] = 13;\n\nret[\"function\"] = \"set_text\";\n\nmsg.payload = ret;\n//msg.topic = \"set_text\";\n\n\nreturn msg;\n","outputs":1,"noerr":0,"x":742.88330078125,"y":398.8833312988281,"wires":[["1fa87483.b31adb"]]},{"id":"c074145a.2b11e8","type":"function","z":"48807c1d.6db04c","name":"Timestamp to HH:MM","func":"//msg.timestamp= new Date().toISOString()\n\nvar now = new Date(); \nvar year = now.getFullYear();\nvar month = now.getMonth()+1; \nvar day = now.getDate();\nvar hour = now.getHours();\nvar minute = now.getMinutes();\nvar second = now.getSeconds(); \n\nif(month.toString().length == 1) {\n var month = '0'+month;\n}\n\nif(day.toString().length == 1) {\n var day = '0'+day;\n} \n\nif(hour.toString().length == 1) {\n var hour = '0'+hour;\n}\n\nif(minute.toString().length == 1) {\n var minute = '0'+minute;\n}\n\nif(second.toString().length == 1) {\n var second = '0'+second;\n} \n\n//msg.timestamp = year+'-'+month+'-'+day+' '+hour+':'+minute+':'+second;\nmsg.payload = hour+':'+minute;\n\n\nreturn msg;","outputs":1,"noerr":0,"x":575.8833312988281,"y":179.88333129882812,"wires":[["b5190bb3.c7181"]]},{"id":"4cb27606.e94b2","type":"inject","z":"48807c1d.6db04c","name":"Time","topic":"text","payload":"","payloadType":"str","repeat":"1","crontab":"","once":false,"x":388.7666320800781,"y":179.01666259765625,"wires":[["c074145a.2b11e8"]]},{"id":"6064ceae.493248","type":"mqtt in","z":"48807c1d.6db04c","name":"TE923 / TC","topic":"sensors/namai/te923/TC","qos":"2","broker":"5252913.f77dff","x":533.9999389648438,"y":345.1832580566406,"wires":[["de7eba35.0d97c"]]},{"id":"4247a366.78dbb4","type":"inject","z":"48807c1d.6db04c","name":"","topic":"text","payload":"--.-","payloadType":"str","repeat":"","crontab":"","once":false,"x":511.8833312988281,"y":402.8833312988281,"wires":[["de7eba35.0d97c"]]},{"id":"5252913.f77dff","type":"mqtt-broker","z":"","broker":"127.0.0.1","port":"1883","clientid":"","usetls":false,"compatmode":true,"keepalive":"60","cleansession":true,"willTopic":"","willQos":"0","willPayload":"","birthTopic":"","birthQos":"0","birthPayload":""}]
After deployment it should start emitting time every second and temperature as soon as it receives message from external temperature sensor. Temperature values comes from TE923 weather station which I hacked 2 years ago.
LED control Python code
This is minimalistic code to illustrate design flow. It implements two functions: set text and clean display, which is enough to demonstrate basic functionality. Feel free to use and abuse it.